When it comes to email marketing and cold outreach, one of the most important elements you can include is an unsubscribe link. Not only is it essential for maintaining compliance with laws like the CAN-SPAM Act and GDPR, but it also ensures your recipients have control over the emails they receive. This helps improve your email sender reputation and prevents your messages from being marked as spam.
In this blog, we will walk you through how to create an unsubscribe link using various tools, including both email marketing platforms for subscribers and cold emailing software like Apollo, Instantly, and Snov.
Why You Need an Unsubscribe Link in Your Emails
Before we dive into the details of how to create an unsubscribe link, let’s quickly go over why it’s crucial:
- Legal Compliance: Many email regulations require you to include a clear and accessible way for recipients to unsubscribe from your email list. In the USA, the CAN-SPAM Act makes it mandatory, while GDPR in Europe emphasizes data privacy, including the right to opt out of communications.
- Build Trust: Giving your subscribers the freedom to unsubscribe shows that you respect their preferences and privacy. This can actually strengthen your relationship with those who remain subscribed.
- Maintain Your Email Reputation: If people can’t find an easy way to unsubscribe, they’re more likely to mark your emails as spam, which could lead to deliverability issues and damage your sender reputation.
How to Create an Unsubscribe Link in Email Marketing Platforms for Subscribers
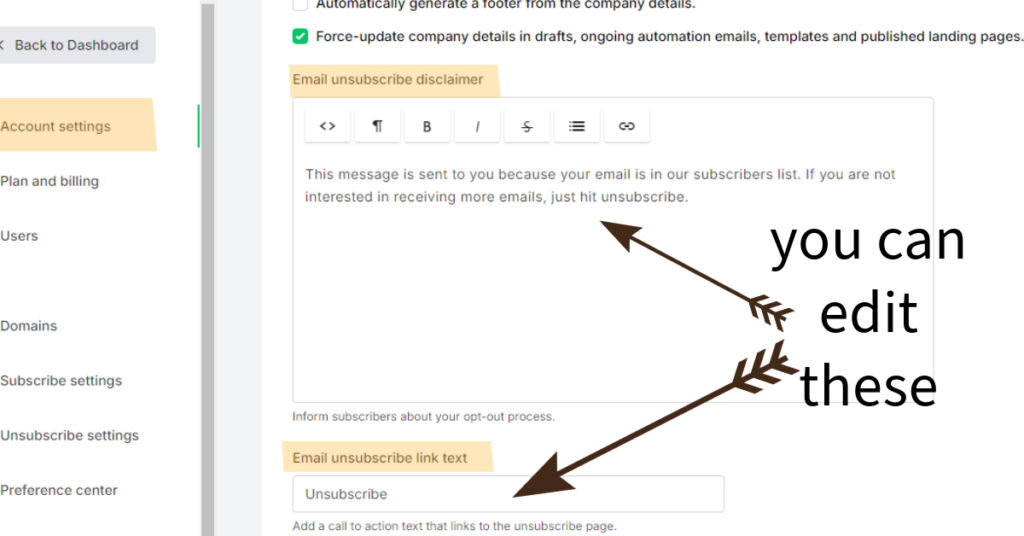
Foremail marketing platforms like Mailchimp, ActiveCampaign, or Constant Contact, the process of adding an unsubscribe link is straightforward. These platforms typically add an unsubscribe option by default in the email footer, but here’s how you can edit unsubscribe link content.
Step-by-Step Guide
- Log in to your ESP( email service provider) and create or edit your email campaign.
- Navigate to the account settings.
- Add one of your emails to the group to which you have to send that automation.
- You can customise the text surrounding the link, such as: If you no longer wish to receive emails, you can unsubscribe here.
If you’re still facing difficulties with your specific ESP, visit the official blog or help section of your ESP. They often provide detailed, step-by-step instructions tailored to their own platform, ensuring that you can create and implement unsubscribe links effectively.
How to Create an Unsubscribe Link for Cold Email Platforms
For cold emailing platforms like Instantly, Apollo, and Snov, adding an unsubscribe link is a little bit different. Cold email outreach is primarily used for lead generation, and depending on the platform, the ability to include unsubscribe links may vary. These platforms also generate an unsubscribe option by default in the email footer but it’s up to you whether you want to add it in automation or not. Snov offer this facility in free plan while Apollo in a paid plan. Apollo provides meeting s and
Creating an Unsubscribe Link
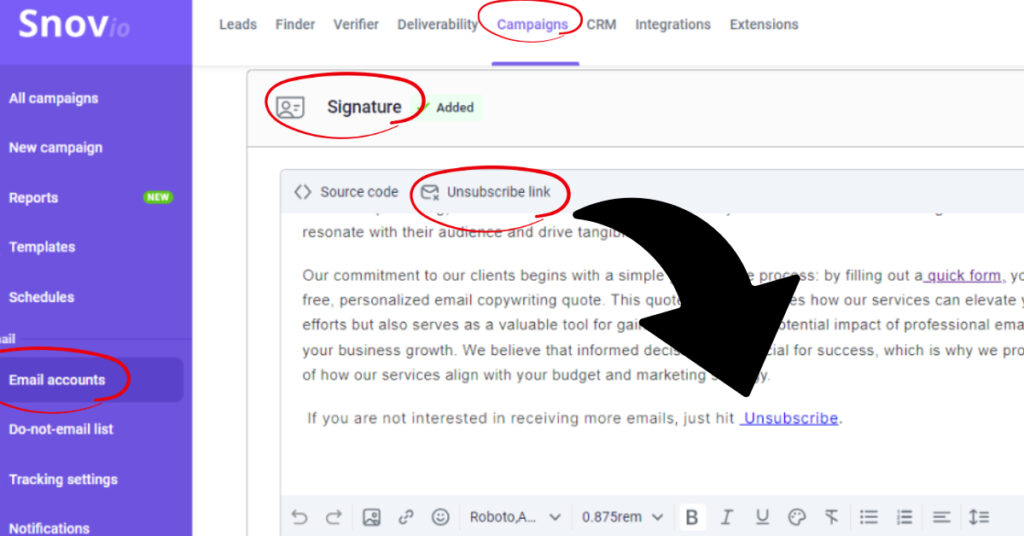
- Activate the unsubscribe link while setting up your email campaign in your software. You will find an option to enable the unsubscribe link in the campaign settings.
- To customize unsubscribe content go to email accounts. Click on the sender account used for the campaign.
- Click on signature.
- click the “unsubscribe link” to add an unsubscribe link.
If you’re still facing difficulties with your specific cold emailing software, visit the official blog or help section of your app. They often provide detailed, step-by-step instructions tailored to their own platform, ensuring that you can create and implement unsubscribe links effectively.
Best Practices for Unsubscribe Links
Now that you know how to create an unsubscribe link, let’s go over a few best practices to ensure you’re optimizing your emails for compliance and user experience:
- Keep it Visible: Don’t hide the unsubscribe link in tiny text or bury it deep in the footer. Make sure it’s easy to find to avoid spam complaints.
- Use Clear Language: Be straightforward with your wording. Phrases like “Click here to unsubscribe” or “Unsubscribe from our emails” work best.
- Offer Preference Management: Instead of only offering an unsubscribe link, consider giving recipients the option to manage their email preferences. This way, they can opt for fewer emails instead of unsubscribing completely.
- No Login Required: Don’t force users to log in or go through complicated processes to unsubscribe. The easier the process, the less frustration for your recipients.
- Immediate Processing: Most laws require you to process unsubscribe requests within 10 business days, but it’s a good practice to remove them from your list immediately.
Testing and Tracking Unsubscribe Links
Before sending out your emails, it’s always a good idea to test the unsubscribe link to ensure it works properly. Here’s how to do it:
- Test on Multiple Devices: Make sure the link works on both mobile and desktop platforms.
- Track Unsubscribes: Most email platforms will track how many people unsubscribe from your emails. Monitoring these metrics will help you adjust your email frequency or content if necessary.
Conclusion
Creating an unsubscribe link is not just a matter of legal compliance—it’s a fundamental part of maintaining healthy, long-term relationships with your subscribers and leads. Whether you’re using a email marketing platform like Mailchimp or a cold outreach tool like Apollo or Snov, ensuring that recipients can easily opt out of your emails will help you improve your email marketing strategy, protect your reputation, and comply with the law.
By following the steps outlined in this guide, you’ll have a functional, compliant unsubscribe link in your emails and cold outreach campaigns in no time.

