You have experienced sometimes that you signed up for valuable newsletters, offers, or tips but they end up in your spam or junk folder. The solution is actually to whitelist the sender’s email address. This ensures that the emails you actually want to receive land in your inbox every time.
Now the question arises “how do you whitelist an email address?”
In this blog post, we’ll explore what does whitelist an email mean and give step-by-step instructions on how do you whitelist an email address, whether you’re using a desktop or mobile app. By the end, you’ll be able to avoid missing out on important updates and messages.
What Does Whitelisting an Email Mean?
Whitelisting an email address simply means adding the sender’s address to your approved list of contacts. This tells your email provider that you trust the sender and want their emails to go directly to your inbox, rather than being mistakenly flagged as spam or junk.
Why is whitelisting important?
Emails from trusted senders, like newsletters, promotions, or tips from businesses you care about, can sometimes get caught in spam filters. When you whitelist their email address, you ensure that those emails aren’t miscategorized and always make it to your inbox.
How Do You Whitelist an Email Address?
How to Whitelist an Email Address on Desktop
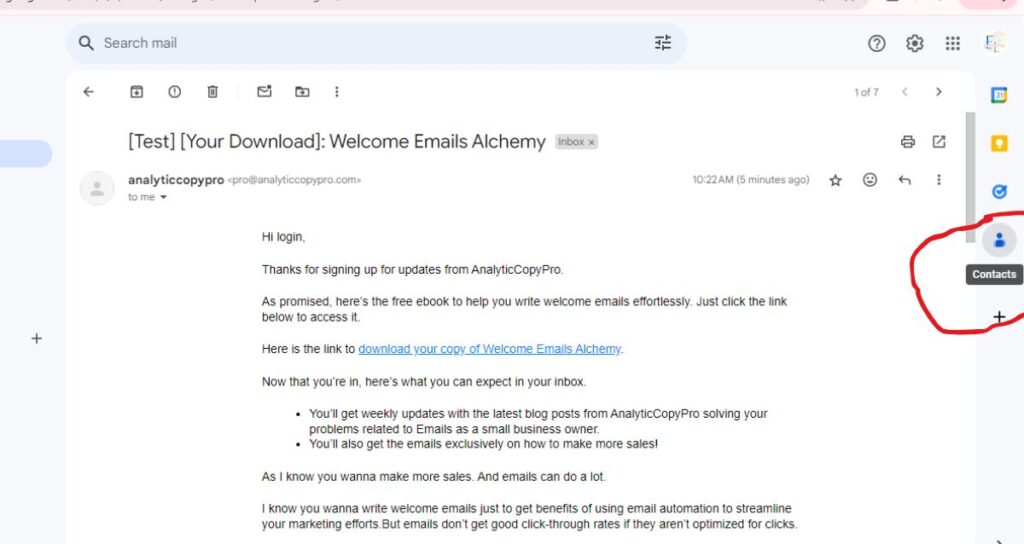
If you’re using your desktop to manage emails, here’s how to add an email address to your approved list. These steps work across most email platforms, so you can apply them no matter which service you use.
Step-by-Step Instructions:
- Open the email: Start by opening an email from the sender you want to whitelist.
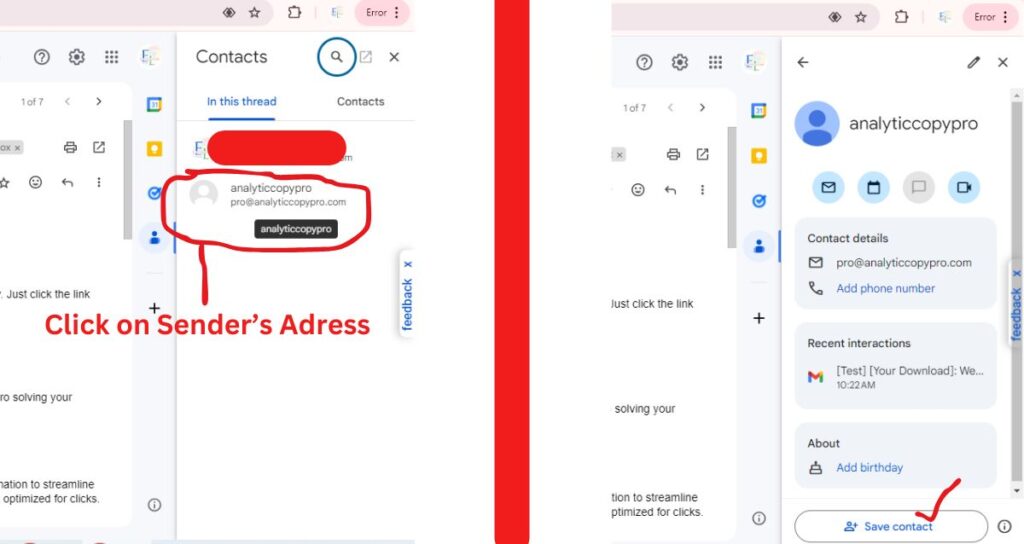
- Add the sender to your contacts:
- Look for an option near the sender’s email address, typically at the top of the email. This might say something like “Add to contacts”, “Add sender to address book”, or “Save contact”.
- Click that option to save the sender’s email address in your contacts list.
How to Whitelist an Email Address on Mobile App
More people now manage their emails on their mobile devices. Fortunately, whitelisting an email address on a mobile app is just as simple as on a desktop. Here’s how you can do it:
Step-by-Step Instructions:
- Open the email: On your mobile email app, locate and open the email from the sender you want to whitelist.
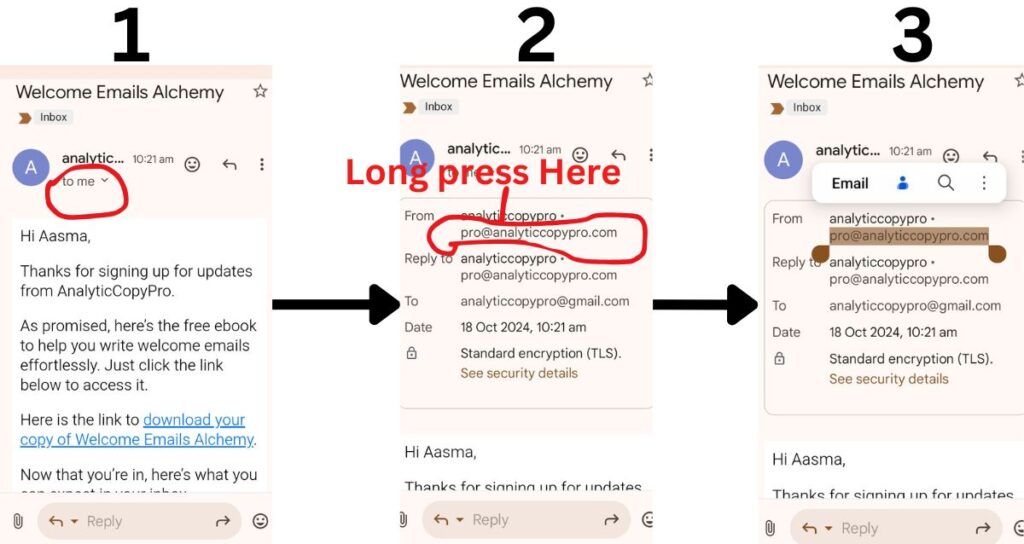
- Add the sender to contacts:
- Tap on the sender’s name or email address at the top of the message.
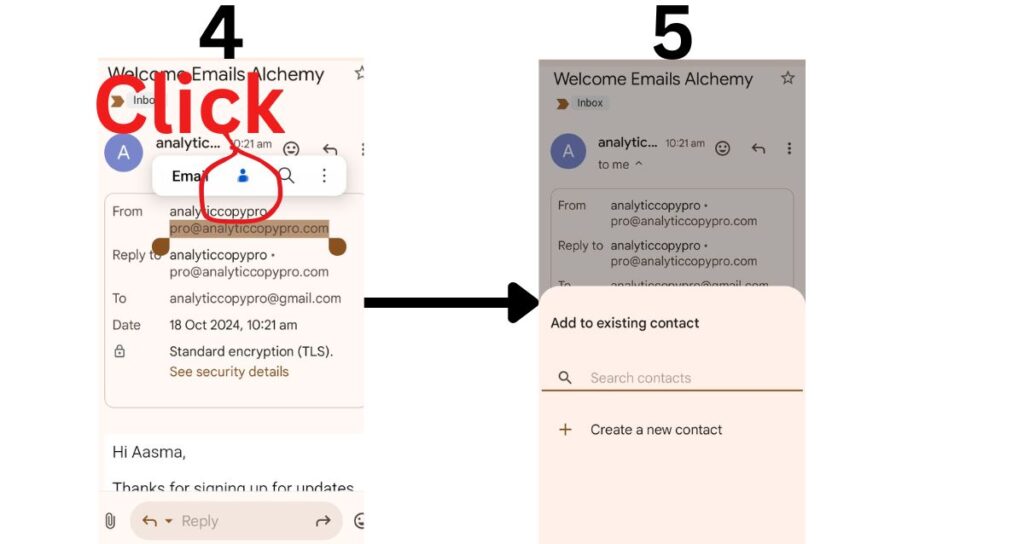
- You should see an option that says something like “Add to contacts”, “Add to address book”, or “Create new contact”.
- Tap this option to save the email address in your contacts.
Move the email out of spam (if needed):
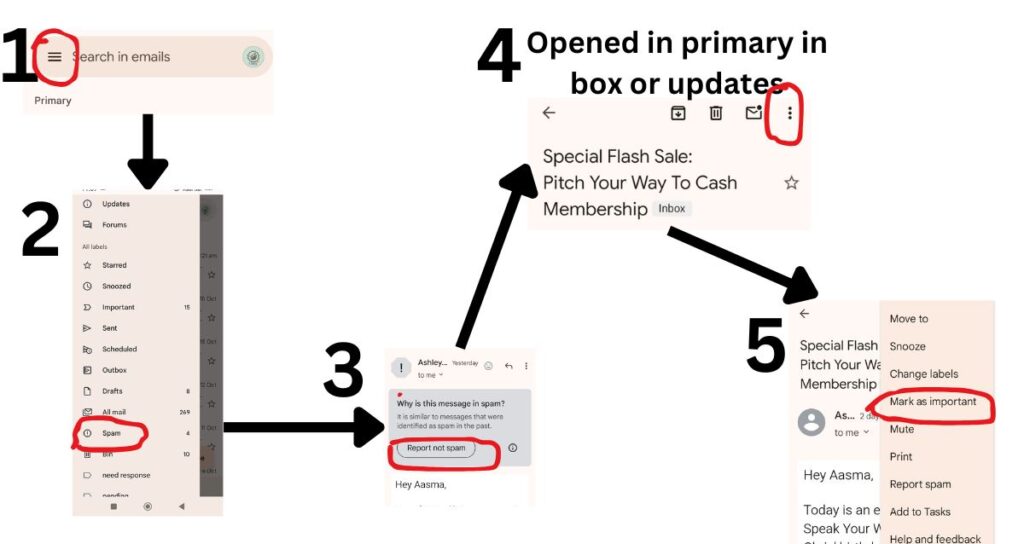
If an email doesn’t seem to be in your primary inbox, chances are it landed in your spam folder, except primary. Follow the following instructions.
- Open Spam folder.
- Open the email and look for a button that says “Move to inbox” or “Mark as not spam”.
- After that return to the primary inbox or updates(if you have enabled it in settings>labels>?categories).
- Open the same email.
- Click on three dots and mark it as important for extra safety.
- This will prevent future emails from that sender from being treated as junk.
This step is the same for desktop and mobile. Then, add the sender’s contact information to your contact list to whitelist email.
Once the sender’s email is saved in your contacts, future emails from them will be delivered to your inbox, avoiding the spam filter.
Why You Should Whitelist Important Senders
Whitelisting helps ensure that you don’t miss out on valuable content, especially when you’re subscribed to email lists for business tips, promotions, newsletters, or special offers. Important updates can be misdirected by aggressive spam filters, even from trusted senders. By taking a few simple steps to whitelist those email addresses, you’ll always stay in the loop.
Conclusion
This is the quickest and simple way to whitelist an email address but an effective way to guarantee that important messages from trusted senders go straight to your inbox. Whether you’re using a desktop or a mobile app, the process takes just a few moments and will help you stay connected without worrying about missing out on valuable emails.
For extra precautions you can spend your time whitelisting emails from your favourite senders in settings to make them safer senders—you won’t regret it!


