In today’s digital landscape, collecting email addresses is a key way to stay connected with your audience, build relationships, and drive engagement. Whether you’re a small business owner, freelancer, or simply gathering responses for an event or project, using a Google Form to collect email addresses is an excellent choice. In this guide, we’ll cover the benefits of Google Forms, how to set it up for email collection, and the best ways to share it for maximum response.
Why Use Google Form to Collect Email Addresses?
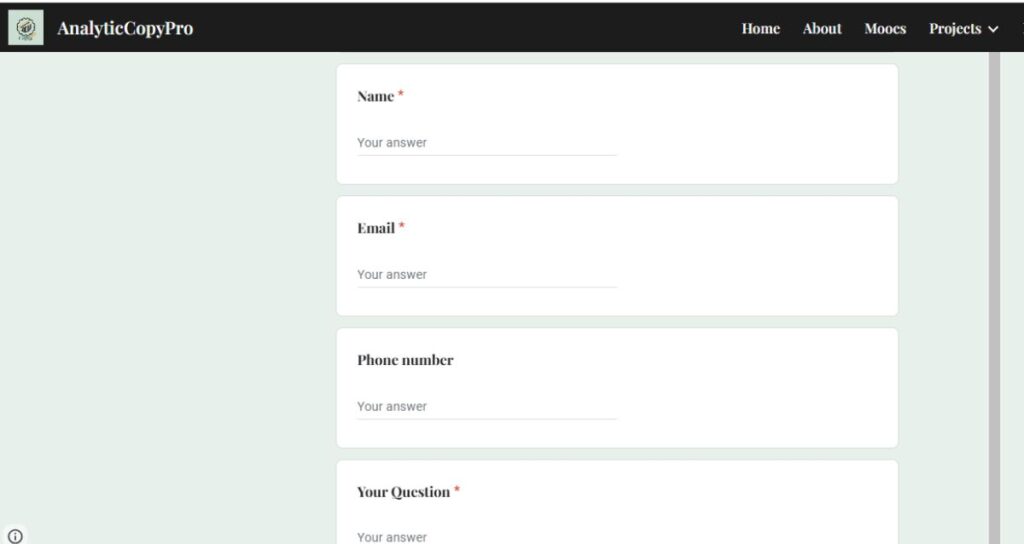
The reason to use a Google Form to Collect Email Addresses is that Google Forms offers several advantages for collecting email addresses:
- It’s Free and Easy: Google Forms is accessible and user-friendly, making it ideal for anyone, even without technical expertise or a website.
- Automatic Data Organization: Responses are automatically collected and organized in Google Sheets, making it easy to view, sort, and manage your email list.
- Customization Options: You can customize the form with brand colors, logos, and tailored questions.
- Integration with Google Tools: Google Forms integrates seamlessly with Google Sheets and Gmail, helping you keep everything organized in one place.
How to Use Google Form to Collect Email Addresses?
Google Forms is a flexible tool that meets various needs. Whether you want to build a mailing list, collect feedback, or send event invitations.
Here we are going to learn how to use a Google Form to collect Email Addresses.
Step 1: Setting Up a Google Form to Collect Email Addresses
To get started with Google Forms, follow these simple steps:
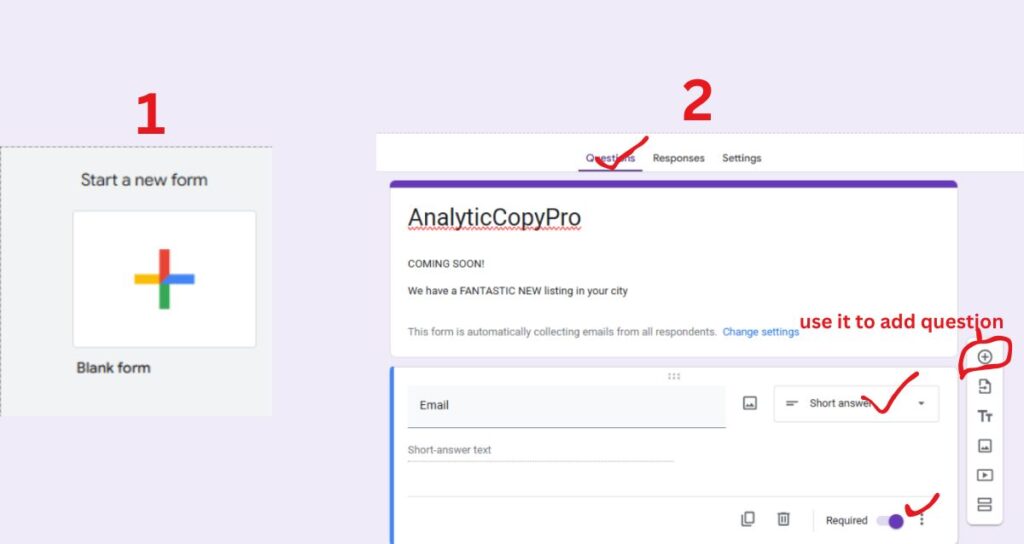
Create a New Form:
- Open Google Forms and click on Blank to start a new form.
- Title your form and add a description to explain the purpose of the form, like “Sign up for updates” or “Stay informed about our events.”
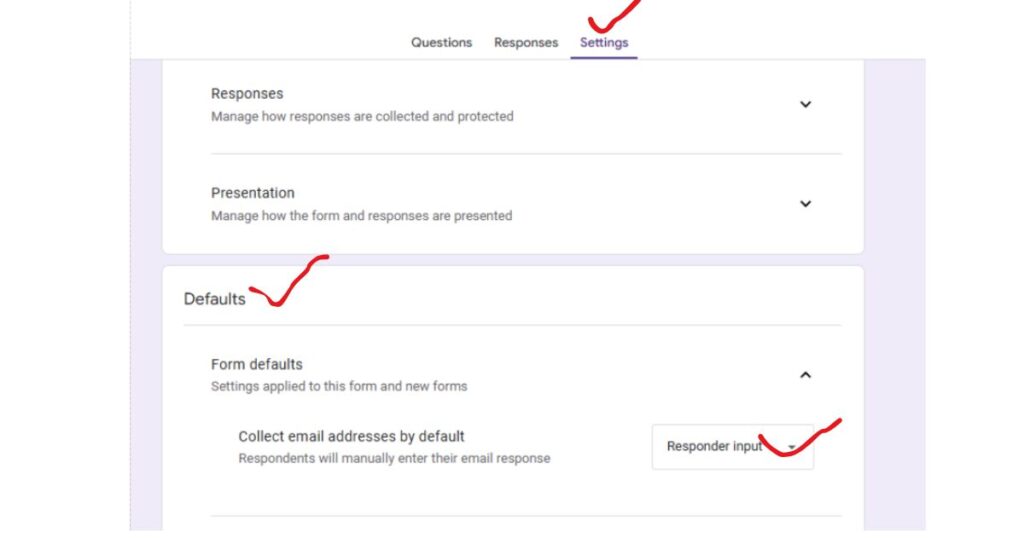
Enable the Email Address Collection Option:
- In the form settings, check the box that says Collect email addresses. This will add a required email field at the top of your form.
Add Additional Questions (Optional):
- While collecting emails is the main goal, adding a few extra questions can help you better understand your audience. Common fields include:
- Name: Useful for personalizing future communications.
- Preferences: Ask about their interests or preferred topics if you plan to segment your emails.
Customize Your Form’s Appearance:
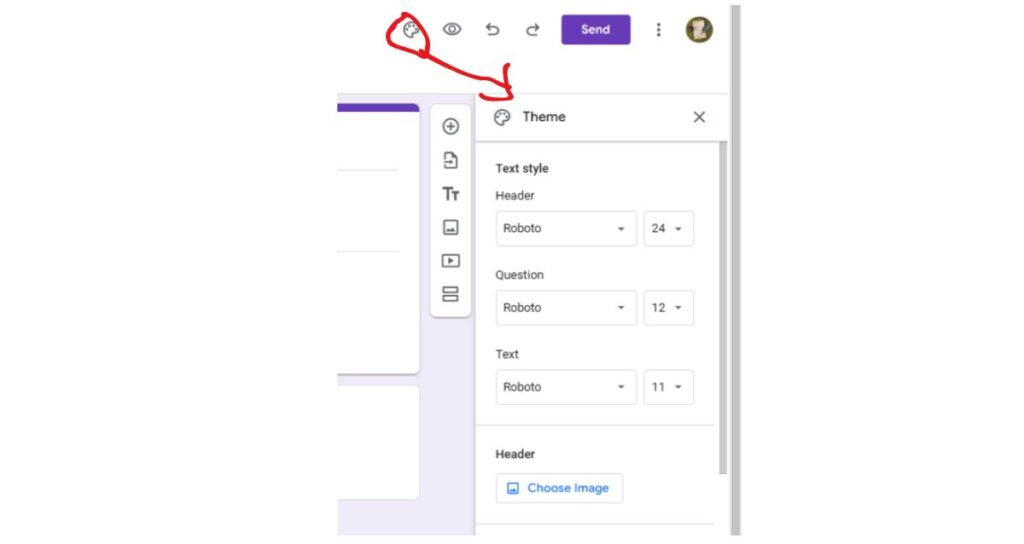
- Make your form visually appealing by adding a brand logo, adjusting the theme color, and using fonts that align with your brand.
Step 2: Privacy and Consent Best Practices
To build trust and maintain compliance with data privacy laws, it’s essential to add a consent section:
- Include a Consent Checkbox:
- Add a required checkbox asking users to agree to receive emails from you. For example, “I agree to receive emails from [Your Brand Name].”
- Brief Privacy Statement:
- You can add a short privacy note in the form description, reassuring users that their data will be used responsibly and only for the stated purpose. If you have a privacy policy, link it here.
Step 3: How to Share Your Google Form to Collect Emails
Once your form is ready, you’ll need to share it to reach your target audience. Here are some effective ways to distribute the form:
- Share on Social Media:
- Post the form link on your social media profiles, such as Facebook, Instagram, Twitter, and LinkedIn. Mention why signing up is valuable (e.g., for exclusive updates, discounts, or event invitations).
- Add to Your Email Signature:
- Include the link in your email signature to passively promote it to everyone you communicate with.
- Share in Direct Messages and Groups:
- Send the form link in WhatsApp, Messenger, or any other messaging app where you’re active. Share it in relevant groups where people might be interested.
- Embed on a Blog Post (if applicable):
- If you have a blog, you can embed or link to the form within relevant articles, guiding interested readers to sign up for more information.
Step 4:Manage Responses with Google Sheets
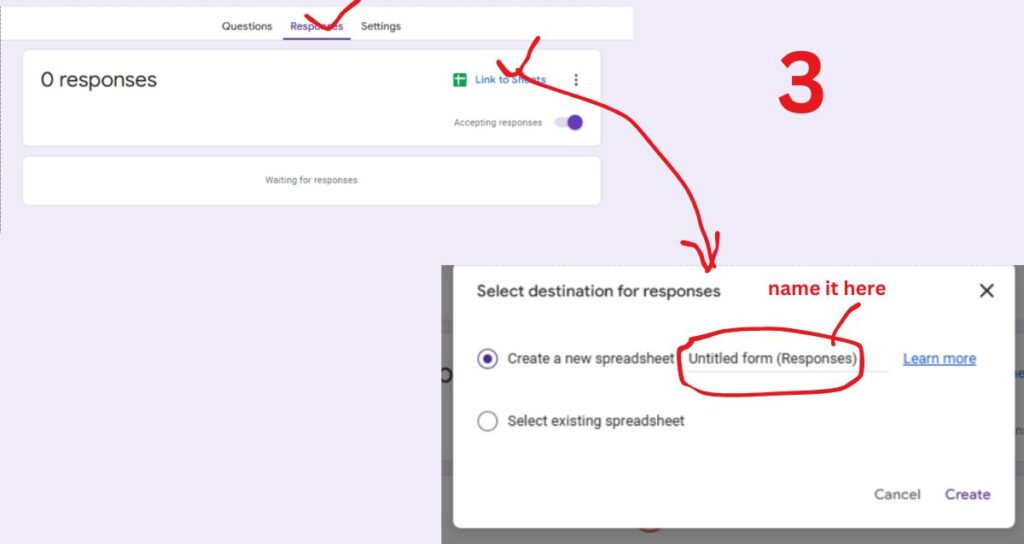
One of the biggest advantages of using Google Forms to collect email addresses is its seamless integration with Google Sheets. When someone submits their email through your form, the response is automatically saved in a linked Google Sheet. This Google Sheet acts as a central database, where you can easily view, sort, and manage all collected email addresses.
You can find goolge sheet related to your form in Google Drive with the name you have given to your sheet in 3rd step.
With Google Sheets, you can take further actions like filtering responses, segmenting contacts, or even adding notes and tags to help organize your list. This integration not only keeps your data organized but also eliminates the need for manual entry, saving you time and reducing the risk of errors. Plus, it’s simple to export this data when you’re ready to move your list to an email marketing platform.
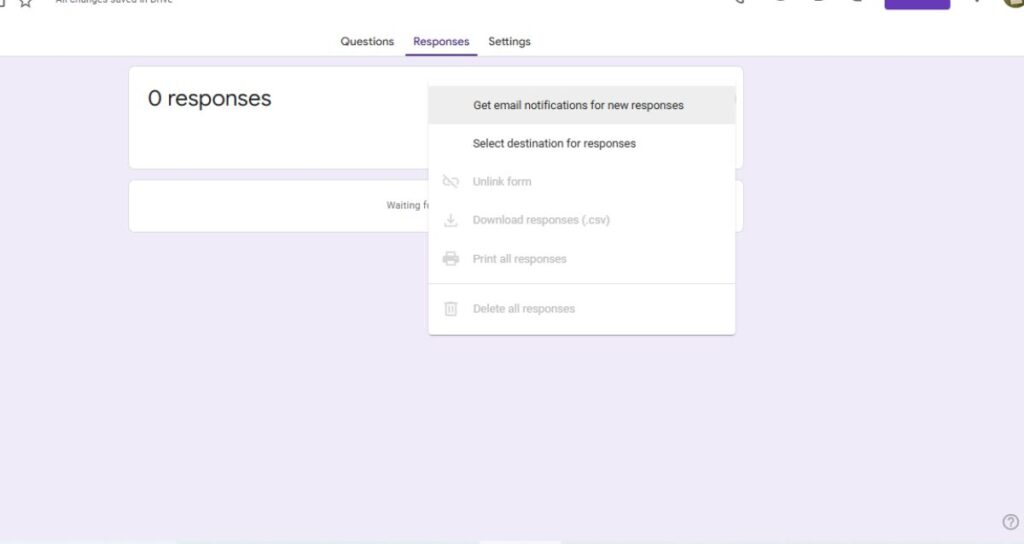
Google Forms automatically saves responses to a linked Google Sheet, making it easy to organize and follow up with your contacts. Here are some tips for managing your list:
- Set Up Notifications:
- In Google Forms responses click three dots, enable email notifications for new responses to stay updated.
- Use Filters to Segment Your List:
- Use Google Sheets’ filter option to organize your contacts based on their answers, preferences, or other data collected in the form.
- Export to Your Email Marketing Platform:
- Once you have a list, you can export the data to your preferred email marketing tool, like MailerLite or Mailchimp, to begin targeted campaigns.
Best Practices to Increase Form Responses
Maximize your form’s effectiveness with these strategies:
- Keep the Form Simple: Only ask for essential information to avoid overwhelming respondents.
- Offer Value: Mention the benefits of signing up, such as access to exclusive content, discounts, or early event notifications.
- Optimize for Mobile: Many users may fill out your form on their mobile devices, so preview it on mobile to ensure it looks good and is easy to complete.
FAQs
1. Can I use Google Forms to collect emails without a website?
Yes! You don’t need a website to use Google Forms for email collection. Simply create the form, copy the link, and share it via social media, email, or messaging apps.
2. How do I make sure emails are entered correctly?
Google Forms has built-in email validation, so users can’t submit the form without providing a properly formatted email address.
3. Is Google Forms secure for collecting personal information?
Google Forms is generally secure and protects data with encryption. However, it’s best to avoid collecting sensitive information (like passwords) and to reassure users that their email will be used responsibly.
4. How do I send a thank-you message after form submission?
In Google Forms settings, customize the Confirmation Message to thank respondents and let them know they’ve successfully signed up.
Conclusion
Using Google Forms to collect email addresses is a simple yet powerful way to grow your email list without a website. With minimal setup, you can create an effective form, share it widely, and build valuable connections with your audience. Just remember to follow best practices for privacy and data security, and you’ll be ready to expand your reach and engage your contacts with ease!
By following these steps, you can turn Google Forms into an efficient lead-generation tool that helps you stay connected and drive long-term engagement with your audience.


